Knitting is an enjoyable and relaxing craft of creating beautiful handmade items. One of the best projects for beginners is a scarf. It is simple to knit, and in the end, one gets a soft, stylish accessory to be proud of. In this post, we will showcase a step-by-step guide on how to knit a scarf, from material selection to finishing. Get your needles and yarn ready, let’s start!
This post includes affiliate links to our favorite products at no additional cost. Thank you for checking them out.
Materials and Tools
Before diving into knitting, gathering all the necessary materials is essential.
Here’s what you’ll need:
Yarn
Choose a medium-weight yarn, such as worsted weight, which is ideal for beginners. It is easy to work with and produces a lovely texture. Select a soft worsted weight yarn in a color you love, preferably a lighter color, since dark colors can be difficult to see.
Stay away from chunky yarn, textured yarn, or very thin yarn, as these are harder to see and work with.
Read the yarn label and look for a #4 yarn.
When selecting yarn, it’s also important to consider the material. Acrylic yarn is highly recommended for beginners due to its affordability, wide range of colors, and easy care. Cotton yarn can also be a good choice, as it is breathable and has a lovely drape, but it might be a bit more challenging to work with initially. Whichever yarn you choose, ensure it has a smooth texture to avoid snagging while you knit.
Once you have your yarn, you should also check the recommended needle size on the yarn label. Most worsted-weight yarns suggest using US size 8 (5mm) needles, but it’s always best to confirm.
Knitting Needles
Next, you’ll need a pair of knitting needles. For beginners, straight needles are the easiest option to use. They come in various materials—metal, wood, or plastic. Wooden needles are often preferred for beginners, as they provide a bit of grip which helps keep your stitches in place.
If you’re unsure of which size to get, use the recommended size indicated on the yarn label. Knitting needles come in different lengths and thicknesses, but a standard length of 10 inches (25 cm) is best.
For your first scarf, we recommend using size 8 (5mm)straight knitting needles. These are large enough to see your stitches clearly but not too big to handle comfortably. The best needles for beginners.
Additional Tools
- Scissors: To cut the yarn.
- Tapestry Needle: For weaving in the ends.
- Measuring Tape: To check the length of your scarf as you knit.
![]()
GET OUR KNITTING ESSENTIALS PRINTABLE HERE
Getting Started
Now that you have your materials, let’s prepare to knit.
Prepare Your Yarn
If your yarn is in a skein, wind it into a ball to make it easier to work with. This will prevent tangles and knots as you knit.
Set Up Your Workspace
Find a comfortable place to knit with good lighting. Having a tidy and organized workspace can make the process more enjoyable.
OPTIONAL: Learn how to make a Gauge swatch here, to figure out how many stitches you might need.
Casting On Stitches
Long Tail Cast On
The first step in knitting is casting on, which creates the foundation row of stitches on your needle.
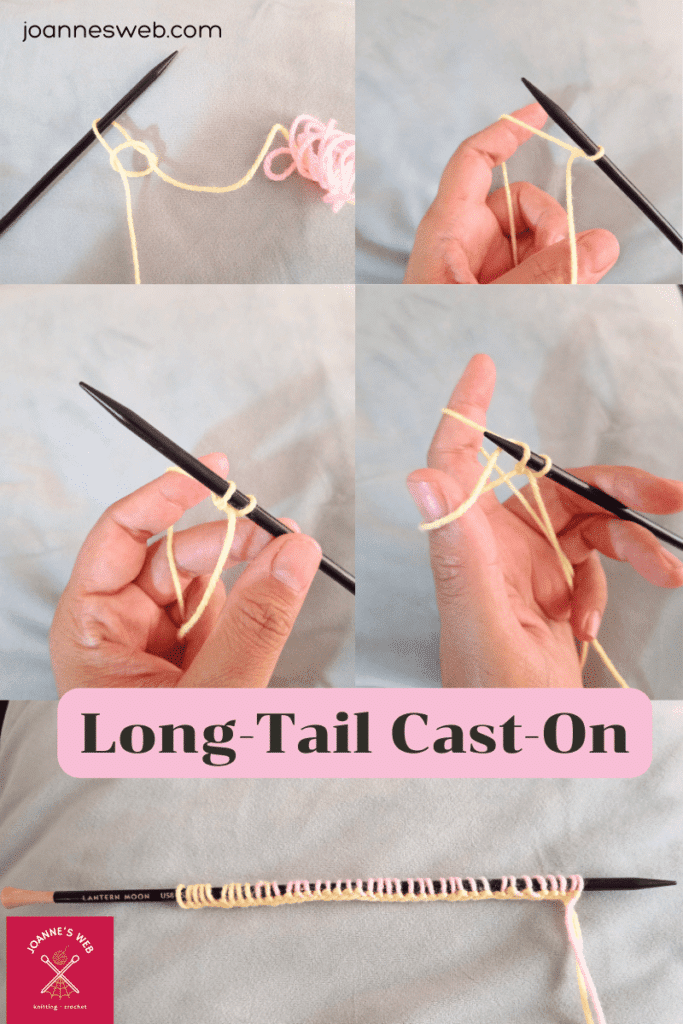
Long-Tail Cast-On Method
- Measure a length of yarn about three times the width of your desired scarf.
- Make a slip knot and place it on one needle.
- Hold the needle with the slip knot in your right hand.
- Use your left hand to hold the yarn, with the tail end over your thumb and the working yarn over your index finger.
- Insert the needle under the yarn on your thumb, then over the yarn on your index finger.
- Pull the yarn through the loop on your thumb and tighten gently.
WATCH THE VIDEO TUTORIAL FOR THIS CAST-ON METHOD
Creating the Knit Stitch
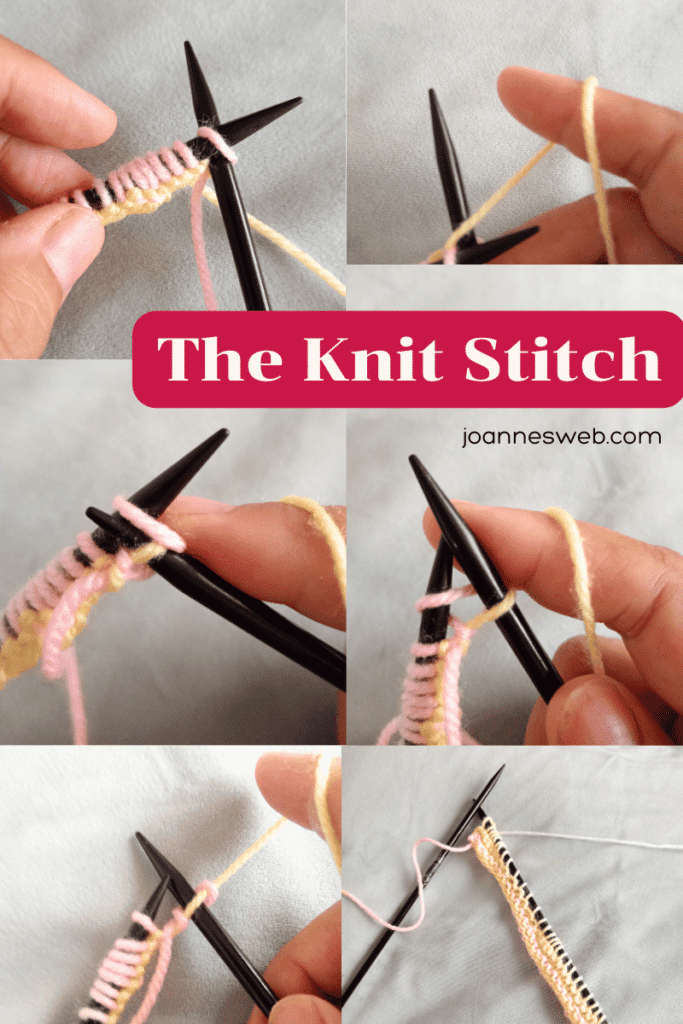
The most basic knit stitch
- Hold the needle with the cast-on stitches in your left hand.
- Insert the right-hand needle into the first stitch from front to back.
- Wrap yarn around the right-hand needle counterclockwise.
- Pull the right-hand needle and yarn through the stitch, creating a new loop.
- Slip the original stitch off the left-hand needle.
Practice this stitch until you feel comfortable with the movement.
WATCH THE VIDEO TUTORIAL FOR THE BASIC KNIT STITCH
NOTE: If you want the simplest form of a scarf, you only need to knit every row, resulting in a garter stitch scarf. You can continue knitting every row until your desired length, skip to the Bind Off section on this post, and continue with the instructions.
If you want to learn the Purl Stitch and make a Stockinette Scarf, please keep reading.
The Purl Stitch
The purl stitch complements the knit stitch and allows you to create various patterns and textures.
Creating the Purl Stitch
- Hold the needle with the stitches in your left hand.
- Bring the working yarn to the front of your work.
- Insert the right-hand needle into the first stitch from back to front.
- Wrap the working yarn around the right-hand needle counterclockwise.
- Pull the right-hand needle and yarn through the stitch, creating a new loop.
- Slip the original stitch off the left-hand needle.
WATCH THE PURL VIDEO TUTORIAL
Combining Knit and Purl Stitches
By combining knit and purl stitches, you can create various textures and patterns, like:
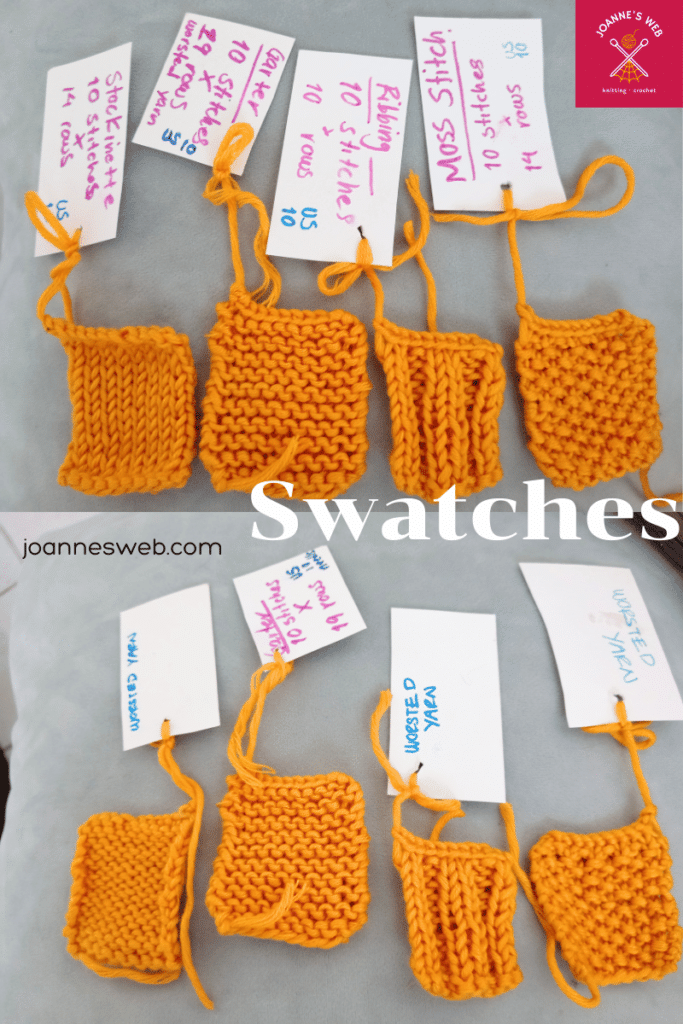
These are all small swatches to show you how different stitches create different fabrics.
- Stockinette Stitch: Alternate between knitting one row and purling the next. This creates a smooth fabric with a right and wrong side.
- Ribbing: 2 knit and 2 purl on one side and the opposite on the other side (2 purl and 2 knit).
Knit and purl are the most basic knitting stitches and you can create many more patterns with them.
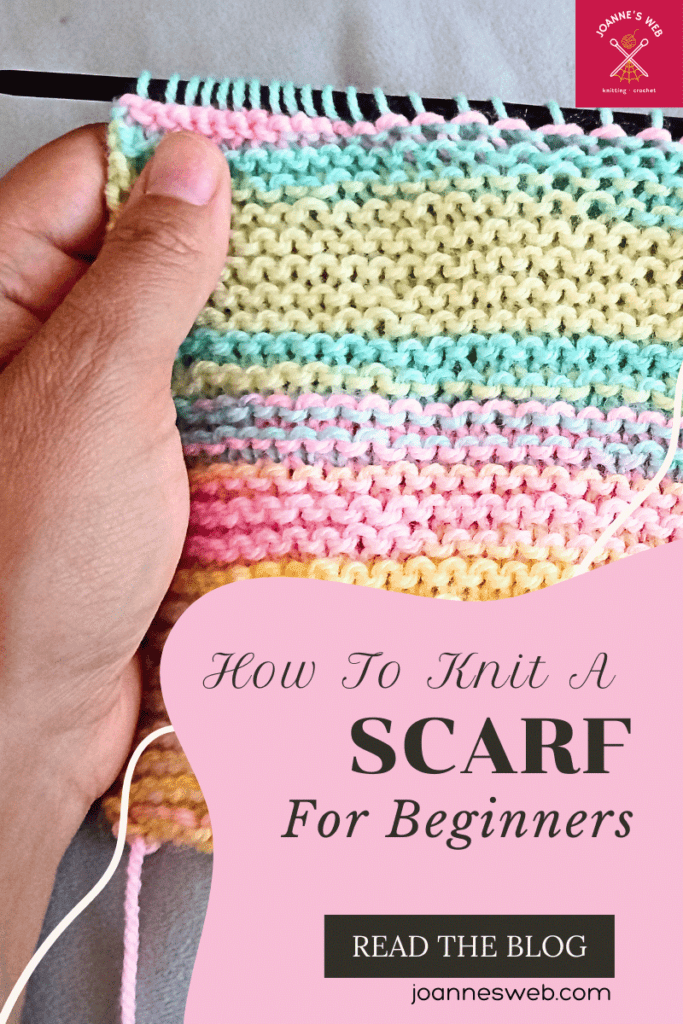
Knitting the Scarf
Now that you know the basic stitches, it’s time to start knitting your scarf.
Starting the Scarf
- Cast on the desired number of stitches for your scarf width. For a standard scarf, 30 stitches is a good start.
- Decide on your pattern. A garter stitch (knitting every row) is simple and effective for beginners.
Good Tips To Keep in Mind:
Maintaining Even Tension
Keep your stitches neither too tight nor too loose. Consistent tension ensures an even fabric. With a simple stitch pattern, like the garter scarf, you should be able to control your grip.
Tracking Rows and Stitches
Use a row counter or make notes to track your progress. This helps maintain uniformity.

Knitting Progress
Adding New Yarn
When you run out of yarn or want to change colors, you’ll need to add a new ball of yarn.
Joining a New Ball of Yarn
- Knit until you have about 6 inches of yarn left.
- Lay the new ball of yarn next to the old one.
- Knit the next stitch with both the old and new yarns together.
- Continue knitting with the new yarn only.
YARN JOIN VIDEO TUTORIAL
Fixing Common Mistakes
Mistakes happen, but they can be fixed!
Identifying Dropped Stitches
Look for loose loops in your fabric. These are dropped stitches that need to be rescued or picked up.
Correcting Dropped Stitches
- Insert a crochet hook into the dropped stitch.
- Pull the dropped stitch through each loop above it until it’s back on the needle.
HANDY VIDEO ON HOW TO FIX DROPPED STITCHES
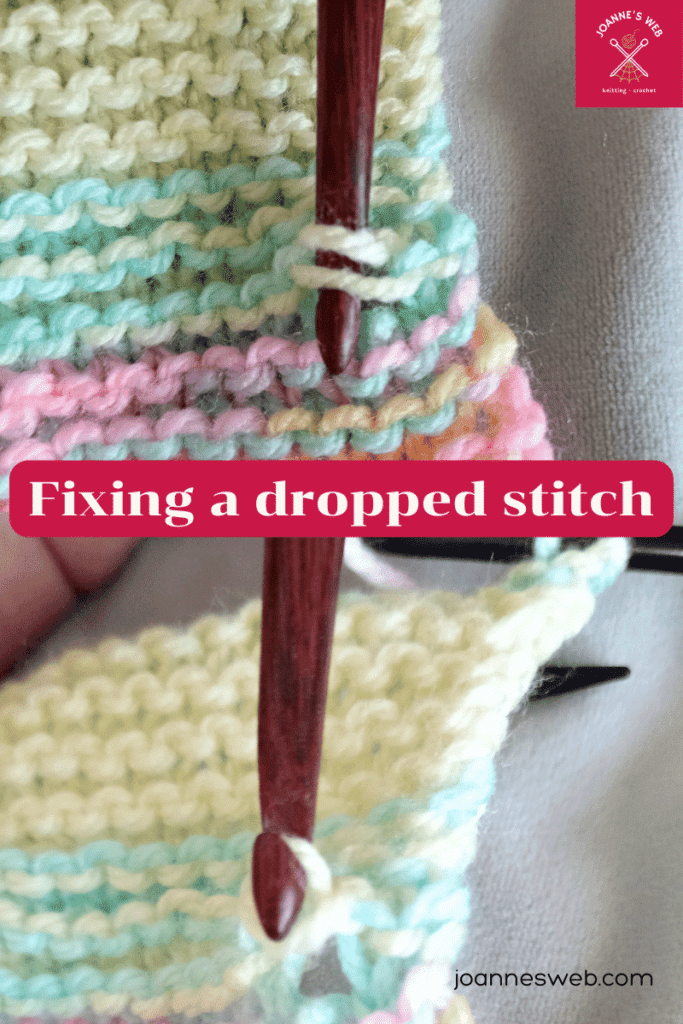
Fixing dropped stitches
Continue Until Your Desired Length
The ideal finished size of a scarf is between 55 and 70 inches ( 152-178 centimeters), but you can customize the length according to your preference.
Binding Off (also known as Casting Off) Stitches
Cast Off Method
When your scarf reaches the desired length, it’s time to bind off.
- Knit the first two stitches.
- Lift the first stitch over the second stitch and off the needle.
- Knit another stitch and repeat until all stitches are bound off.
- Cut the yarn, leaving a 6-inch tail, and pull it through the last stitch.
BIND OFF VIDEO TUTORIAL
Weaving in the Ends
Use a tapestry needle to weave the loose ends into the fabric, ensuring they are secure and invisible.
WATCH THE QUICK VIDEO ON HOW TO WEAVE IN ENDS
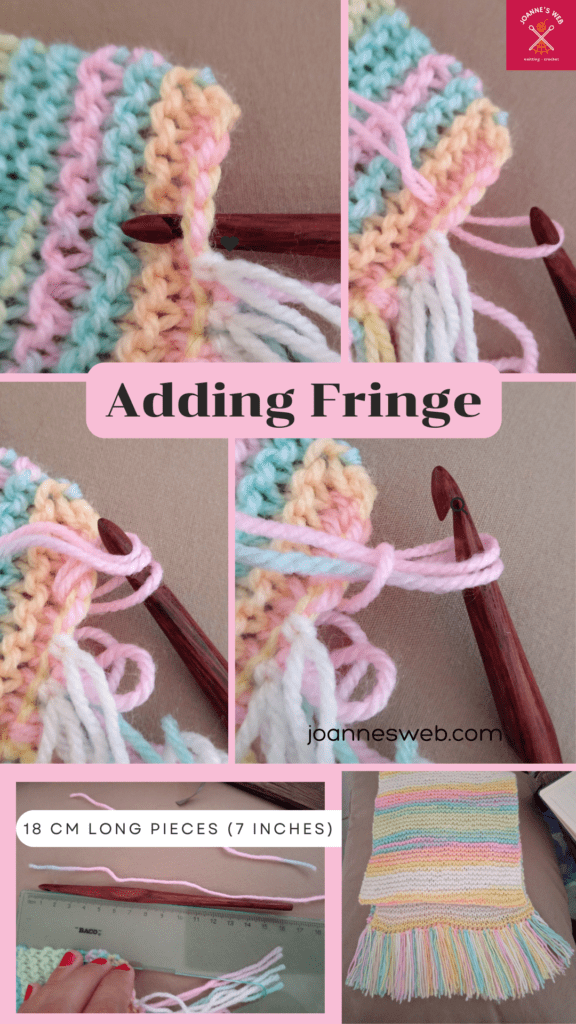
Adding yarn fringe to a scarf
Adding Fringe (Optional)
Fringe adds a decorative touch to your scarf.
Creating Fringe
- Cut several pieces of yarn, each about 12 inches long.
- Fold a piece of yarn in half and use a crochet hook to pull the loop through the edge of the scarf.
- Pull the ends through the loop and tighten.
- Repeat along the edges, spacing the piece of fringe evenly.
WATCH THIS VIDEO TUTORIAL ON HOW TO ADD FRINGE
Blocking the Scarf
Once your scarf is finished, blocking is a great way to enhance its appearance and drape. Here’s how to do it:
- Soak the Scarf: Begin by filling a basin or sink with lukewarm water. Add a mild detergent or some fabric softener to help relax the fibers. Gently submerge your scarf, making sure it’s fully saturated. Allow it to soak for about 10 to 15 minutes.
- Rinse: Carefully drain the soapy water and rinse the scarf with cool, clean water until all the soap is removed. Avoid wringing or twisting the fabric; instead, gently press out excess water by pressing it against the side of the basin.
- Lay Flat to Dry: Find a clean, dry towel and lay it flat on a surface. Place the wet scarf on the towel and roll it up gently to soak up additional moisture. Then, lay the scarf flat on a drying rack or a clean, dry towel. Make sure it’s in a shape
- Pin the scarf to the desired shape and let it air dry completely.
Caring For Your Knits
Storing Your Scarf
Store your scarf flat or rolled to prevent creasing and stretching.
Handling Pilling
Remove any pilling with a fabric shaver or a sweater comb.
Congratulations on knitting your first scarf! With this basic project under your belt, you’re ready to explore more basic knitting patterns and techniques. Check out our other knitting tutorials for more fun projects.
RESOURCES
How To Knit: The Absolute Beginners Guide
The Beginners Toolkit
100 Popular Knitting Definitions
Knitting Basics Playlist on our YouTube channel
Scarf Knitting Patterns on Pinterest
More Scarf Patterns For Beginners
 Common Questions in Basic Knitting:
What is the best type of yarn for beginners? Medium-weight yarn, such as worsted weight, is ideal for beginners because it is easy to work with and produces a nice texture.
How much yarn will I need for a basic scarf?
For a standard scarf, you’ll need about 200-300 yards of yarn, depending on the thickness of the yarn and the length of the scarf.
How many stitches should I cast on for a basic scarf?
For a standard width, cast on between 30-40 stitches. The exact number depends on the width you want and the thickness of your yarn.
How do I know when my scarf is long enough?
A standard scarf length is about 60-70 inches, but you can adjust this based on personal preference. Measure the scarf as you go to ensure it’s the length you want.
How long does it take to knit a scarf?
The time it takes to knit a scarf depends on your knitting speed and the length of the scarf. On average, it can take a few days to a couple of weeks.
Can I knit a scarf without a pattern?
Yes, knitting a simple garter stitch scarf (knit every row) doesn’t require a pattern and is perfect for beginners.
How do I care for my finished scarf?
Follow the care instructions on your yarn label. Most scarves can be gently hand-washed in cold water and laid flat to dry to maintain their shape.
What should I do if I make a mistake?
If you make a mistake, you can either unravel the rows (known as frogging) to correct it or use a crochet hook to fix dropped stitches. Practice patience, as mistakes are part of the learning process!
How do I weave in the ends of the yarn?
Use a yarn needle to thread the loose end and weave it through the stitches along the edge of the scarf, then trim any excess yarn.

0 Comments