Knitting is a craft of creativity and personalization for making garments and accessories. One crucial skill every knitter should master is seaming knitting patterns together. This technique ensures your finished pieces look neat and polished.
In this guide, we will walk you through the process of sewing knitting patterns (knitted piece of fabric) together, providing handy tips and detailed instructions to help you achieve perfect results every time.
This article includes affiliate links of our favorite products at no extra cost to you. Thank you for checking them out.
The Importance of Seaming Knits The Right Way
Seaming involves joining two pieces of knitted fabric to create a finished garment.
Using the right technique for your knits makes them look flawless and well-constructed, not to mention more durable. If you don’t invest some time in proper seaming, the uneven joins can detach and even warp your fabric and make it look uneven.
Tools and Materials Needed for Seaming
Before you begin seaming your knitting patterns, gather the following tools and materials:
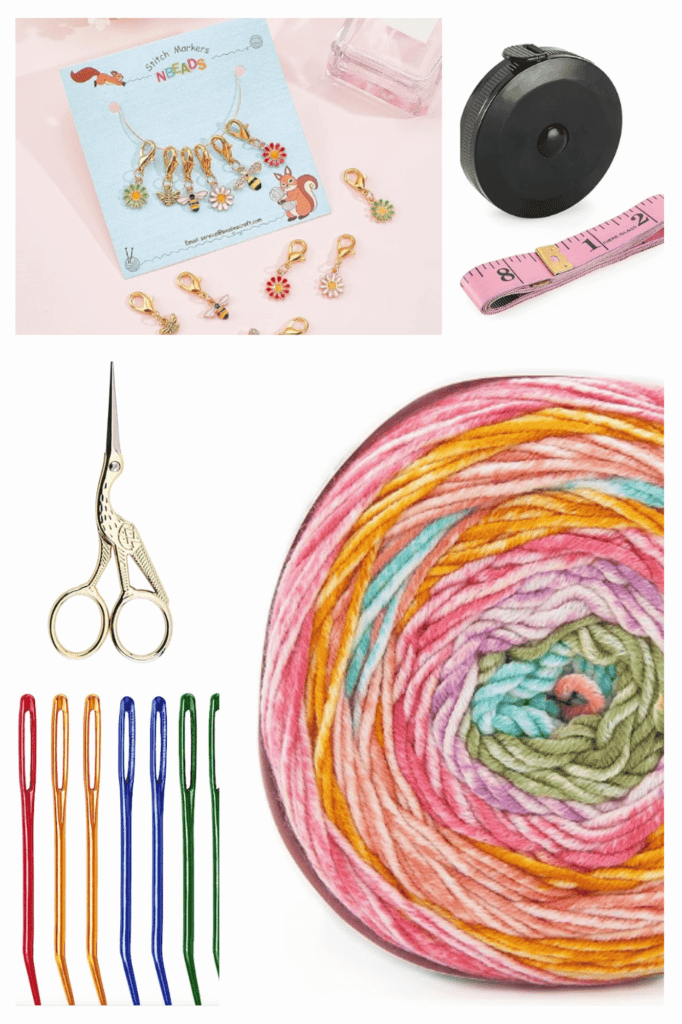
Knitting Materials For Seaming (sewing) Knits
Preparing Your Knitted Pieces for Seaming
Preparation is key to successful seaming.
Follow these steps to get your knitted pieces ready:
-
Block Your Pieces: Blocking helps even out the stitches and makes the fabric easier to work with.
-
Align the Edges: Ensure the edges of your knitted pieces are aligned correctly before starting to seam.
-
Secure Loose Ends: Weave in loose ends to prevent unraveling during seaming.
The Mattress Stitch: A Seamless Finish
The mattress stitch is a popular technique for seaming knitting patterns together because it creates an almost invisible seam.
Follow these steps:
-
Align the Edges: Place the two pieces to be seamed side by side with the right sides facing up.
-
Insert the Needle: Insert the tapestry needle under the first horizontal bar in one piece.
-
Repeat on the Other Side: Insert the needle under the corresponding bar on the other piece.
-
Pull the Yarn Through: Pull the yarn through, leaving a tail for weaving in later.
-
Continue Seaming: Repeat the process, alternating sides, and pulling the yarn snug but not too tight.
VIEW THE VIDEO TUTORIAL FOR THIS TECHNIQUE
Seaming Garter Stitch
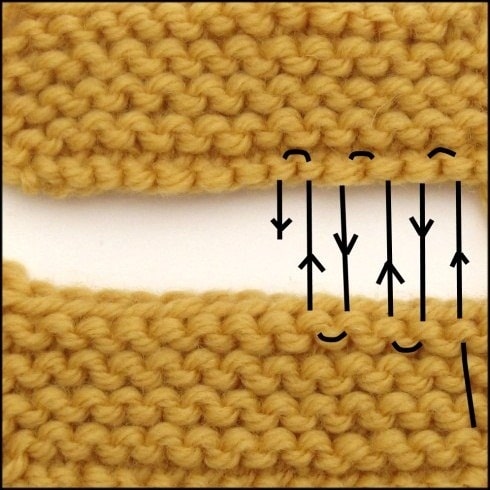
garter seam by Natty Knitter
Seaming garter stitch can be tricky due to its texture. Here’s how to achieve a neat seam:
-
Match the Ridges: Align the garter ridges on both pieces.
-
Use the Mattress Stitch: Follow the mattress stitch technique, but be mindful of the garter ridges.
-
Adjust Tension: Ensure the seam is flexible and matches the stretch of the garter stitch.
VIEW THE VIDEO TUTORIAL FOR THIS TECHNIQUE
Seaming Stockinette Stitch Side To Side
Stockinette stitch side to side (not edge to edge) is smoother and easier to seam. Here’s the method:
-
Align the Edges: Place the stockinette pieces with the right sides facing up.
-
Insert the Needle: Insert the needle under the horizontal bars of the first stitch on each piece.
-
Seam with the Mattress Stitch: Continue using the mattress stitch technique, ensuring the seam is even and secure.
VIEW THE VIDEO TUTORIAL FOR THIS TECHNIQUE HERE
Seaming Ribbing
Ribbing requires careful attention to maintain its elasticity. Follow these steps:
-
Match the Ribs: Ensure the rib patterns align perfectly on both pieces.
-
Use a Flexible Seam: Use a mattress stitch or a similar technique that allows for stretch.
-
Check the Tension: Regularly check the tension to keep the ribbing elastic.

Knot-to-knot seaming
Knot-To-Knot Seaming
This refers to joining two pieces of fabric that have both been knitted in the same direction, often from the top down. This technique is especially useful when assembling garments like sweaters or cardigans where you need to connect shoulder seams or other aligned edges.
To achieve a clean and seamless join, it’s important to carefully align the stitches at the tops of both pieces. This video will be helpful for showing where to insert the needle through a knot. It creates an almost invisible join, keeping the seam strong yet flexible.
WATCH THE TUTORIAL HERE
Whipstitch Seaming
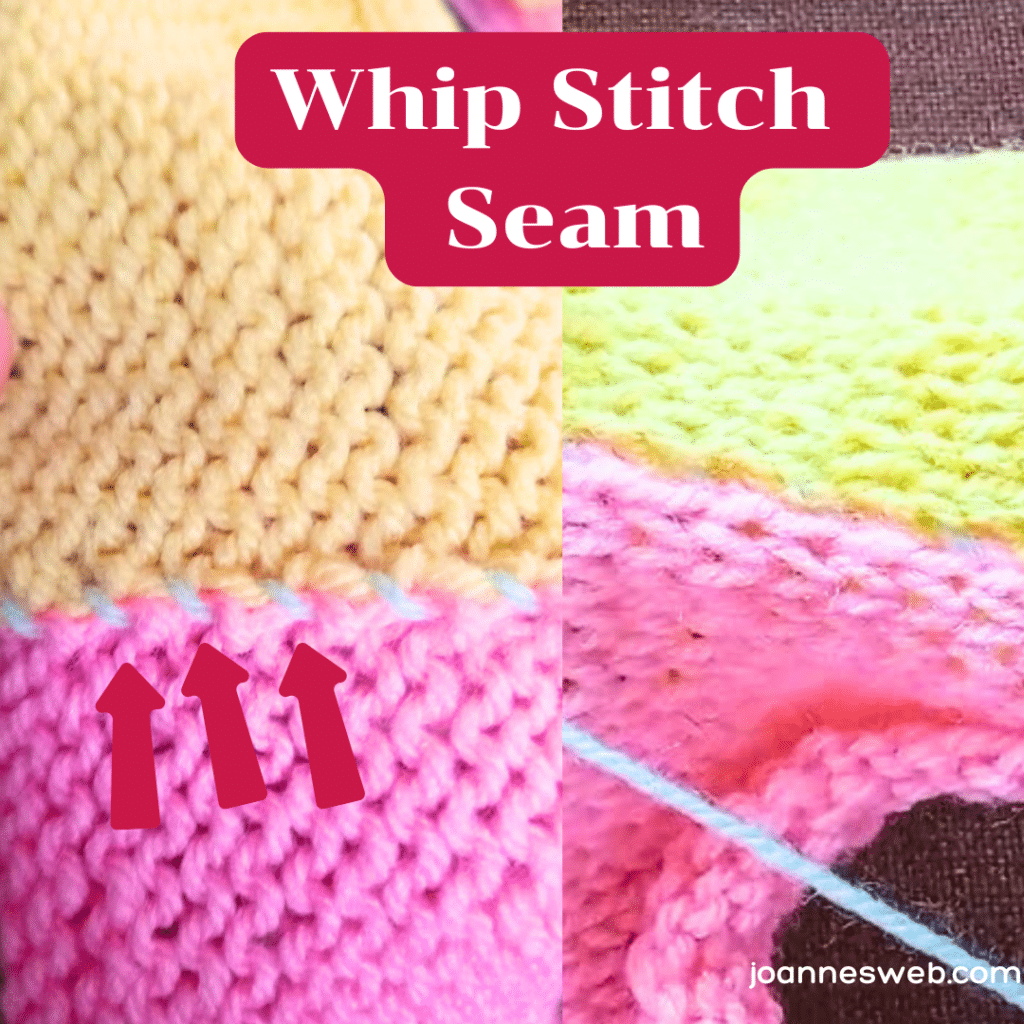
Whips Stitch Seam
This is a straightforward and effective technique for joining two pieces of knitted fabric.
To begin, align the edges of the pieces you wish to seam, holding them together with the right sides facing out.
Thread a tapestry needle with a length of yarn, ideally the same yarn used for knitting.
Starting at one end, insert the needle through the edge stitches of both pieces from back to front, pulling the yarn through.
Continue this process, making sure each stitch wraps around the edges in the same direction, creating a spiral or “whip” effect along the seam.
Keep the tension consistent but not too tight, allowing the seam to have a bit of flexibility.
The whip stitch creates a neat, visible edge that’s ideal for seams that won’t be hidden, such as on the edges of a blanket or a decorative garment.
WATCH THE TUTORIAL HERE
Seaming Opposite Direction Pieces
There are many other ways to seam stockinette, like when you need to seam side to edge, as in this video tutorial.
In this situation, it’s important to carefully align the rows to ensure a seamless join.
-Start by matching the stitches at the beginning of the seam and pinning the pieces together if necessary.
Seaming Stretechy Knits
Using a stretchy seam is best for keeping a stretchy garment flexible. Techniques like the modified mattress stitch, loose backstitch, and whip stitch with stretchy yarn are best to keep the seam moving with the fabric, preventing tightness and breakage.
Periodically test the seam’s flexibility. Proper finishing, such as weaving in ends and flexibility and blocking, ensures a smooth, professional finish that preserves the garment’s stretch and wearability.
This is also a quick and practical seam, that while invisible, is not perfect for every garment.
Tips For Perfect Seams
Achieving perfect seams takes practice. Here are some expert tips:
-
Practice on Swatches: Practice seaming on small swatches before working on your main project.
-
Use Matching Yarn: Use the same yarn as your project or a yarn of similar weight and color for the seam.
-
Check Your Work: Regularly check your progress to ensure the seam is even and neat.
Common Mistakes to Avoid
Avoid these common mistakes to ensure a flawless seam:
-
Not Blocking Your Pieces: Skipping the blocking process can lead to uneven seams.
-
Pulling the Yarn Too Tight: Tight seams can cause puckering and affect the garment’s fit.
-
Ignoring Edge Stitches: Make sure to seam all edge stitches to avoid gaps and holes.
Advanced Seaming Techniques
Once you’ve mastered the basics, try these advanced techniques:
-
Kitchener Stitch: Ideal for grafting live stitches together seamlessly.
-
Three-needle Bind-Off: Perfect for shoulder seams and other structural joins.
-
Crochet join: Joining pieces with a crochet hook.
Get Your Sewing Techniques Cheat Sheet HERE
FAQs
How do I seam knitting patterns with different stitch patterns? To seam different stitch patterns, match the edge stitches and use a flexible seaming technique like the mattress stitch. Pay attention to the tension to ensure a smooth join.
Can I seam knitting patterns together using a sewing machine? While possible, using a sewing machine for knitting seams is not recommended. It can be challenging to maintain even tension and may damage delicate knitted fabrics.
What is the best way to seam sleeves into a sweater? Use the mattress stitch for setting in sleeves. Align the sleeve cap with the armhole, matching the stitches, and seam from the top of the sleeve cap down to the underarm.
How can I make my seams less visible? To make seams less visible, use the mattress stitch and match the yarn color to your project. Blocking your pieces before seaming also helps achieve a smooth finish.
Is it necessary to block my knitted pieces before seaming? Yes, blocking is essential as it evens out stitches, making seaming easier and resulting in a more professional finish.
What if my seam looks uneven? If your seam looks uneven, check your tension and ensure you are picking up the correct bars on each piece. Undo the seam and try again if necessary.
Seaming can seem tedious for many and we know some avoid it like the plague. But once you have enough experience and start seeing the results of your efforts, you will learn to like it. There are many other techniques online, but these are the ones we know tend to yield the best results, and the more invisible seams as well.
Let us know how it goes!

0 Comments