Mastering the Lifeline Technique in Knitting: A Step-by-Step Guide
In this post, we’ll delve into the lifeline technique—an invaluable tool for every knitter. Whether you’re a beginner or one, understanding and utilizing the lifeline technique can save you from unraveling your hard work and make complex projects more manageable. Join us as we demystify this game-changing technique and provide a step-by-step guide to incorporating it into your knitting repertoire.
Understanding the Lifeline Technique
What is the Lifeline Technique?
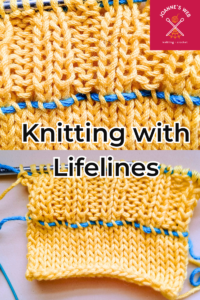
Lifelines in knitting are threads or pieces of yarn that are inserted through a row of stitches as a safety measure. They act as markers and provide a way to easily recover stitches in case of mistakes or the need to unravel a section of knitting. Lifelines are typically inserted every few rows or at critical points in complex patterns.
Why Should You Use a Lifeline?
When you are learning to knit or start a more complicated pattern like lace knitting, it’s a great idea to add a lifeline. It helps you unravel the section you made a mistake on without the possibility of losing more stitches or getting them mixed up and tangled.
When to Add a Lifeline to Your Knitting
When transitioning between sections: If your knitting project has distinct sections, such as different stitch patterns or motifs, adding a lifeline at the end of each section can be helpful. This allows you to easily separate sections and unravel or fix any mistakes specific to that particular section.
Before attempting a challenging technique: Certain knitting techniques can be challenging, such as cabling or knitting with multiple colors. Adding a lifeline before attempting these techniques can provide a safety net in case you need to redo the section.
When you’ve made significant progress: If you’ve completed a substantial portion of your project and want to ensure you have a safety net, you can add a lifeline at this point. This way, even if you encounter a problem later on, you won’t have to unravel your work all the way back to the beginning.
Selecting the Right Lifeline Material
Ideally, you must choose a thinner or equally weighted yarn than that you are working with and use a daring or sewing needle that is not too small or too large and can easily go through all the mounted or knitted stitches.
How to Add a Lifeline
To add a lifeline, you can use a contrasting color of smooth waste yarn or dental floss. Thread it onto a tapestry needle and carefully weave it through the stitches on your knitting needle, ensuring that it catches each stitch accurately. Leave the lifeline in place until you no longer need it, and remember to replace it with a new one as you progress in your project.
Sometimes adding a lifeline can be an afterthought, but that’s ok as you can weave it in. As long as you pick up every stitch and it’s secured in place.
Identify the mistake: Examine your knitting to determine where the mistake or issue is located. It could be a dropped stitch, a misaligned stitch, or a problem with the stitch pattern.
Remove the needle: Carefully take out the needle from your knitting, making sure not to unravel any stitches further.
Locate the lifeline: Find the lifeline that you previously inserted. It should be threaded through a row of stitches below your current row.
Unravel to the lifeline: Gently unravel your knitting, stitch by stitch or row by row, until you reach the lifeline. The lifeline will act as a stable point, ensuring you don’t unravel beyond that row.
Fix the mistake: Once you’ve reached the lifeline, you can now address the mistake. This could involve reknitting the incorrect stitch, fixing a dropped stitch, or adjusting the stitch pattern as needed.
Reinsert the needle: After you’ve fixed the mistake, reinsert your knitting needle into the stitches along the row above the lifeline.
Continue knitting: With the needle back in place, you can resume knitting from where you left off, making sure your stitches align with the ones below the lifeline.
Complex Stitch Patterns and Lace Knitting
Lace patterns are more complicated and so we are more prone to make mistakes on them.
To correct a lace pattern with the help of a lifeline you must assess the stitches:
Study the stitches around the mistake, both above and below the lifeline. Pay attention to their structure, yarn overs, decreases, and any other unique elements of the pattern. Compare them to previous pattern repetitions to see if they match. Many lace knitting patterns include a graph, so you can compare your project to it.
Lifelines in Colorwork Projects
Choose lifeline placement: Determine where you want to insert the lifeline in your colorwork project. You can either add it at regular intervals or before specific colorwork sections, depending on the complexity of the pattern and your personal preference.
Fixing mistakes: If you make a mistake in your colorwork, such as crossing the wrong yarn or misplacing a stitch, you can use the lifeline as a reference point for undoing and redoing the section. Carefully unravel the colorwork section above the lifeline, stitch by stitch or row by row, until you reach the lifeline. Then, fix the mistake and rework the colorwork stitches using the guidance of the pattern.
You can add many lifelines at different points of your colorwork project.
Lifelines for Large Projects and Intensive Knitting
Consider using multiple lifelines: For very large projects or those with complex stitch patterns, you might find it helpful to have multiple lifelines at different points. This way, if you make a mistake or need to unravel, you have multiple reference points to choose from, minimizing the risk of losing progress.
Other things to consider when working on large projects:
Plan lifeline placement: Determine the frequency at which you want to insert lifelines in your large project. Depending on the complexity of the pattern, the size of the project, and your personal preference, you might choose to add lifelines every few inches, at the end of each pattern repeat, or after completing a particularly intricate section.
Use removable markers: To make it easier to insert lifelines, consider using removable stitch markers to mark the specific rows where you plan to add them. This way, you can easily locate the desired row when it’s time to insert the lifeline.
Be mindful of yarn texture and weight: When selecting the lifeline yarn, choose a smooth yarn that won’t catch or snag on your stitches. Additionally, consider using a lifeline yarn that is of a similar weight or slightly thinner than your project yarn to prevent it from distorting the tension or altering the fabric.
Protect against accidental removal: To ensure the lifeline remains intact throughout your knitting process, tie a secure knot or use a small safety pin at each end of the lifeline. This prevents it from accidentally slipping out while you work.
Remove and reposition lifelines: As you progress in your project and feel confident about the stability of your work, you can remove previously inserted lifelines to reduce bulk and interference. However, if you encounter a particularly challenging or intricate section, it might be prudent to keep older lifelines in place until you successfully complete that segment.
using a lifeline on a knitting project
Lifeline Removal and Final Steps
Removing a lifeline is a straightforward process once you no longer need it. Here’s how you can remove a lifeline from your knitting:
Ensure stability:Before removing the lifeline, make sure that your stitches above and below the lifeline are secure and won’t unravel unintentionally. This is especially important if you’ve made any modifications or corrections after inserting the lifeline.
Locate the lifeline: Identify the lifeline thread running through your stitches. It should be easily visible, typically a contrasting color or material from your project yarn.
Gently pull the lifeline: Start at one end of the lifeline and carefully pull it out, sliding it through the stitches. Maintain a gentle and steady pull to avoid distorting or pulling on the stitches.
Repeat if necessary: If you had multiple lifelines in your project, repeat the process of removing each one individually, ensuring you remove the correct lifeline without disturbing any adjacent stitches.
Once you have removed the lifeline(s), you can continue with the final steps of your project:
Finishing touches:If you have any remaining sections or details to complete, such as ribbing, borders, or edging, follow the pattern instructions to finish those sections.
Binding off:When you reach the end of your project, it’s time to bind off or cast off the stitches. Again, refer to your pattern for the appropriate bind-off method to use.
Blocking:Depending on the type of project and yarn used, you may want to block your finished piece. Blocking involves wetting or steaming the knitting to even out the stitches, relax the fabric, and enhance the overall appearance. Follow the recommended blocking method for your specific project.
Enjoy your finished project: Once your knitting is dry and any blocking is complete, your project is ready to be used, worn, or displayed. Take pride in your accomplishment and enjoy the fruits of your knitting labor!
Remember, lifelines can be a valuable tool during the knitting process, but they should be removed when no longer needed to ensure they don’t inadvertently become part of the finished project.
By mastering the lifeline technique, you’ve added a powerful tool to your knitting arsenal. No longer will mistakes or complex patterns leave you feeling discouraged or frustrated. With a lifeline in place, you can confidently tackle intricate projects, knowing that you can always return to a stable point if needed. Remember, practice makes perfect, so start incorporating lifelines into your knitting projects and watch your skills soar to new heights.
We use cookies on our website to give you the most relevant experience by remembering your preferences and repeat visits. By clicking “Accept”, you consent to the use of ALL the cookies.
This website uses cookies to improve your experience while you navigate through the website. Out of these cookies, the cookies that are categorized as necessary are stored on your browser as they are essential for the working of basic functionalities of the website. We also use third-party cookies that help us analyze and understand how you use this website. These cookies will be stored in your browser only with your consent. You also have the option to opt-out of these cookies. But opting out of some of these cookies may have an effect on your browsing experience.
Necessary cookies are absolutely essential for the website to function properly. This category only includes cookies that ensures basic functionalities and security features of the website. These cookies do not store any personal information.
Any cookies that may not be particularly necessary for the website to function and is used specifically to collect user personal data via analytics, ads, other embedded contents are termed as non-necessary cookies. It is mandatory to procure user consent prior to running these cookies on your website.